We use cookies to ensure that we give you the best experience on our website. If you continue to use this site we will assume that you are happy with it. Learn more
How to Use a Floor Polishing and Grinding Machine - Lavina Series 7
How to Use a Floor Polishing and Grinding Machine - Operation and Maintenance
In 2023, Superabrasive is launching its brand new Lavina S7 polishing and grinding machine range, featuring new designs to maximise efficiency and ease of use.
In this article, I will explain how to properly use the floor grinders and polishers from Lavina's Series 7 range. This includes operating, inspecting and maintaining the grinding machine. Additionally, the are several tools and accessories suitable for these floor machines depending on the treatment. I will cover our top recommendations.
For any more advice, give us a call at 0121 773 9129 or send us a message online.
How to Use a Polishing and Grinding Machine - Lavina Series 7
Before operation -
A first-time operator must always read the manual and pay attention to all safety instructions.
Before even thinking about starting the machine, ensure the work surface is clear of any debris or objects.
Never use the grinding and polishing machine outdoors in rainy or snowy weather.
Perform general, daily inspections of the machine and inspect the machine before each use. Make sure there are no missing parts which is especially important after repair, maintenance or transportation. Also, be sure to inspect the safety devices.
The tool protector must be working. When working with the Quick Change Pads, mount the security disc.
The machine must be clean.
Do not fill the water tank whilst the machine is running or when the main switch is turned on.
Before turning on the machine, ensure the base is placed on the floor. The machine must not be in a titled position when starting.

Starting the machine -
To start the floor machine: plug it into a power supply. At this time, the power indicator will glow in green.
When you're ready to begin work, switch the "Ready on/off" button to allow the power supply into the machine's control board.
Use the “Run/stop” switch to run the machine
During operation -
Guide the floor polishing and grinding machine along the stone surface in straight lines. Somewhat overlap the previously completed area with each line.
Aim to work at a consistent speed. The grit size of different tools affects their work time. Your work speed is dependent on the work time of these tools. Furthermore, do not stop the floor machine while the tools are running as it leaves marks on the stone surface.
The water hose must move freely and must be damage-free.
Avoid working on an uneven surface to prevent the grinding and polishing machine from being damaged.
Wet use
When working wet, select the destination of the water feed with the water tap and periodically to release water onto the floor surface.
Dry use
When working dry, check the floor surface periodically for dust accumulation. Check regularly to see if your vacuum works properly.
Stopping the machine -
To stop the floor machine either rotate the “Run/stop” switch into the “stop” direction or use the EMG stop button. In case of emergency always press the “Emergency stop button”.
After operation, the user must carry out a visual inspection of the floor machine. Address any defects immediately when discovered. Pay especially close attention to the power cords, vacuum hose, plugs and loose bolts or screws.
After Operation -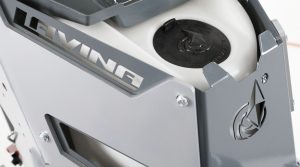
Clean the stone floor grinding machine and its surroundings properly.
Empty and clean the water tank.
Store the machine in a safe place.
For information about operating the Series 7 polishing and grinding machines read the Lavina Operator Guide.
Floor Machine Inspection and Maintenance
It is important to keep your polishing machine clean after use. Regularly cleaning the machine helps detect and address potential problems before they can damage the machine. This is doubly the case for checking and cleaning the tool plate connections, vacuum hoses, and water tank.
After using the machine, the operator should carry out a visual inspection of the machine. Any defect should be fixed immediately. Pay close attention to power cords, plugs and vacuum hoses, loose bolts or screws.
Recommended Tools and Accessories
The type of pad you use depends on the floor surface and the level of cleaning required. There are pads available for all types of flooring, including concrete, tile, wood, and more. Make sure to choose the correct pad for your floor surface to ensure the best results.
Quick Change Metal Bond Tool System
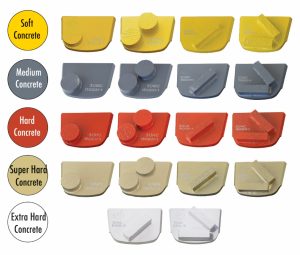
The Quick Change Metal Bond Tools excel in fast and easy tool changes as well as serving a long life. These quick change tools are available in 5 different bonds for soft, medium, hard, super hard and extreme hard concrete floors in various grit sizes. You can adjust the aggressiveness of the cut by choosing one or two buttons or rectangular segments.
Corsa Hybrid Discs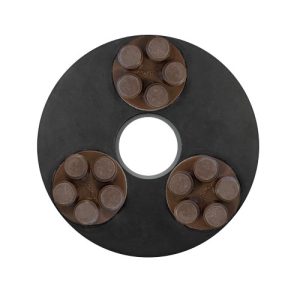
The Corsa Hybrid Discs with quick change ring style were crafted for scratch removal and transitioning from metal to resins. The hybrid discs are most similar to the Calibra Discs; however, the Corsa discs have a modified ceramic bond. As such, they are more efficient for all types of concrete: soft, medium and hard.
These scratch-removal tools are suitable for wet and dry use but are best for dry application.
Additionally, these transition discs won’t glaze or prematurely wear out on soft and medium concrete.
V-Harr Premium Polishing Pads
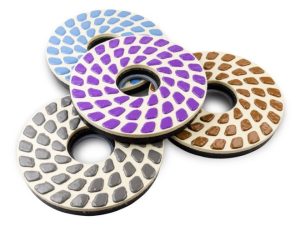
The V-harr premium polishing pads are one of Suprabrasive's most popular and versatile diamond tools for concrete polishing.
They offer stone surfaces a premium shine thanks to a specially crafted combination of felt, resin and diamonds. The pads are perfect for mechanically restoring and polishing concrete. They are also ideal for polishing terrazzo and hard stone floors.
We strongly suggest using the V-HARR polishing pads dry on concrete. Although, they produce dazzling gloss results on black granite when used wet.
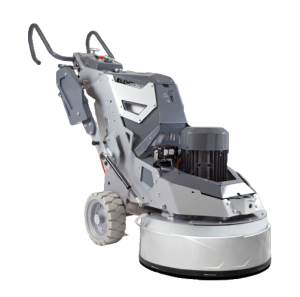
About the Lavina Series 7 Floor Polishing and Grinding Machines
Primarily, there are two main components of the Series 7 floor machine: the carriage and the grinding head.
Several changes to its internal components have led to enhanced and more consistent performance from the grinding head. There are stronger time belts, seals, shafts, bearings and lighter pulleys. These components allow for efficient power transmission when grinding.
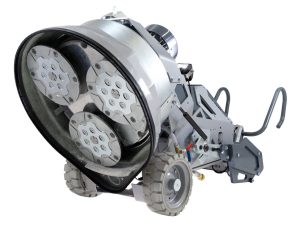
The machine is equipped with three LED lights to ensure the operator can work in darker job sites. However, these LED lights do not replace adequate overhead lighting.
The Series 7 machines are kitted with the most intuitive handlebar. It is designed to provide the operator with the most convenient operating position while the machine is in use. The machine is also equipped with a three-way water tap allowing users to choose between the water tank and external hose as a water source.
Moreover, a secondary water tap allows the operator to adjust the water flow level. The vacuum hose port is located on the back of the machine.
There are three Quick Change tool holders on the bottom of the grinding head. They provide fast and secure mount and dismount of Superabrasive's Quick Change tools.
More Information
Thank you for reading the latest article from Tiling Logistics. We hope to have supported you with your stone maintenance journey. For any further advice on using a floor grinding and polishing machine don't hesitate to call us on 0121 773 9129 or send us a message online. We are always willing to support our customers by being available to pick up the phone and guide you if you need help or have any questions.
Alternatively, visit the Tiling Logistics blog for more helpful articles covering different floor and wall restoration and maintenance treatments and products.